Battery switch on travel trailer function is crucial for managing your RV’s power. This guide will walk you through understanding its purpose, different types, wiring, operation, and troubleshooting. We’ll cover everything from basic functionality to advanced techniques for power management and extending battery life. Get ready to become a power management pro!
Understanding your travel trailer’s battery switch is key to preventing electrical issues and ensuring a smooth, enjoyable camping experience. Proper use and maintenance will safeguard your investment and help you avoid costly repairs down the road. We’ll explore various scenarios, including integrating alternative power sources, to provide a comprehensive understanding of this vital system.
Understanding Battery Switch Functionality in Travel Trailers
Your travel trailer’s battery switch is a crucial component, acting as the central control for your trailer’s power. It allows you to easily disconnect or connect your house batteries from the rest of the electrical system, preventing battery drain and protecting your sensitive electronics. Understanding its function is key to maintaining your trailer’s electrical system and avoiding costly repairs.
Battery Switch Types
Travel trailers typically utilize one of three main battery switch types: single, dual, and selector switches. A single battery switch simply connects or disconnects a single battery bank to the trailer’s 12-volt system. A dual battery switch manages two separate battery banks, often used for larger trailers or those with a dedicated deep-cycle battery for house power and a starting battery for the tow vehicle.
A selector switch offers more control, allowing you to choose between shore power, one battery bank, both battery banks, or a complete disconnect. The choice depends on your trailer’s setup and power needs.
Typical Wiring Configuration
The wiring configuration for a battery switch system is relatively straightforward. The switch is usually located near the batteries and connects directly to the positive (+) terminal of each battery. From the switch, the positive wire runs to the distribution panel, powering various 12-volt appliances and systems within the trailer. Negative (-) battery terminals are typically connected directly to the chassis, creating a ground path.
Proper grounding is critical for safe and efficient operation. Always consult your trailer’s wiring diagram for specific details.
Operating a Battery Switch
Operating a battery switch is usually a simple process, but it’s important to understand the positions and their implications. Most switches have clearly marked positions, often including “OFF,” “BATTERY,” “BOTH” (for dual switches), and “SHORE POWER” (if applicable). Before operating the switch, ensure the power is off at the main breaker panel. To connect the battery to the trailer system, simply move the switch to the appropriate position.
To disconnect the battery, switch it to the “OFF” position. Always double-check the switch position before disconnecting from shore power or leaving your trailer unattended for extended periods.
Battery Switch and Power Management
Your travel trailer’s battery switch is the central hub for managing power flow from various sources, ensuring a smooth and efficient energy supply for your adventures. Understanding its function is key to preventing costly mistakes and maximizing your battery’s lifespan. This section details how the switch works and how to use it effectively.The battery switch acts as a gatekeeper, controlling the flow of electricity between your trailer’s batteries, shore power (hookups at campgrounds), and your generator.
In the “off” position, it completely isolates the batteries, preventing accidental discharge or cross-charging. The “battery” position connects only the batteries to the trailer’s 12-volt system. The “shore power” or “generator” position typically connects those power sources to the trailer’s 12-volt system and often includes a charging circuit for your batteries. This allows you to run appliances directly from shore power or your generator while simultaneously charging your batteries.
Some switches also offer a “both” or “combined” position that allows you to run the trailer on both shore power/generator and batteries concurrently.
Preventing Cross-Charging and Draining Issues
The battery switch is crucial for preventing unwanted interactions between your power sources. For example, if you have a fully charged battery bank and connect to shore power without using the switch correctly, you might inadvertently backfeed power into the shore power system, potentially damaging your trailer’s electrical system or even the campground’s power supply. Similarly, leaving the switch in the wrong position could drain your batteries if you’re not connected to an external power source.
The switch allows you to isolate your batteries from shore power or the generator, preventing these issues. Proper use ensures your batteries are only charged when intended and are protected from being discharged when you’re running on an external power source.
Isolating Batteries During Maintenance or Storage
Before performing any maintenance on your batteries (like cleaning terminals or adding water to flooded-cell batteries), always turn the battery switch to the “off” position. This completely isolates the batteries from the rest of the trailer’s electrical system, preventing accidental shocks or short circuits. Similarly, when storing your travel trailer for an extended period, switching the batteries off prevents parasitic drain from devices like clocks or carbon monoxide detectors, thereby extending battery life.
Always disconnect the negative terminal as a secondary safety measure before undertaking any maintenance.
Extending Battery Life Through Effective Switch Usage
Proper usage of the battery switch significantly impacts battery life. Avoid leaving your batteries connected to shore power indefinitely, as overcharging can damage them. Instead, use a smart charger or monitor your battery’s voltage regularly to ensure optimal charging. When not connected to shore power or a generator, remember to switch to the “battery” position only when needed, to minimize parasitic drain.
Regularly checking the switch position is a simple but vital habit to protect your investment and avoid potential problems. Consider investing in a battery monitor to help you track your battery’s state of charge and ensure you’re not over-charging or excessively draining them.
Troubleshooting Common Battery Switch Problems: Battery Switch On Travel Trailer Function
Your travel trailer’s battery switch is a crucial component, ensuring power flows correctly to your appliances. Problems with this switch can leave you without lights, refrigeration, or other essential systems. Understanding common issues and troubleshooting steps can save you frustration and potential breakdowns on the road.
Several issues can prevent your battery switch from functioning correctly. These problems often stem from simple, easily fixable issues, but diagnosing the problem is the first step to getting back on track.
Common Battery Switch Problems
Corrosion, loose connections, and switch failure are the most frequent culprits behind a malfunctioning battery switch. Corrosion builds up on terminals over time, especially in humid environments, creating resistance and hindering current flow. Loose connections, whether at the battery terminals, the switch itself, or the wiring to your appliances, can interrupt the electrical circuit. Finally, the switch itself can fail due to wear and tear, overheating, or simply age.
Diagnosing Power Issues
If your appliances aren’t receiving power, the first step is to check the battery switch itself. Is it in the correct position? Many switches have multiple positions, including “off,” “battery,” “shore power,” and sometimes a “both” setting. Ensure it’s correctly aligned to the power source you intend to use.
Checking Battery Voltage and Amperage
A multimeter is your best friend in diagnosing electrical problems. You’ll need to check the voltage at various points in the system. First, check the voltage directly at the battery terminals. A fully charged 12-volt battery should read around 12.6 volts. Then, check the voltage at the output terminals of the battery switch.
So, you’re planning a trip? Awesome! Don’t forget travel insurance – it’s a lifesaver. Check out Aon travel insurance for comprehensive coverage, especially if you’re into adventurous activities. They’ve got you covered, literally. Then, for a quick comparison, browse Aon travel insurance options to find the best fit for your budget and travel style.
Seriously, don’t skip this step; peace of mind is priceless!
A significant voltage drop between these two points indicates a problem with the switch or its connections. Next, check the voltage at the positive and negative terminals of an appliance that isn’t working. A lack of voltage here confirms the problem lies somewhere between the switch and the appliance. Amperage testing should only be done by experienced individuals, and only with appropriate safety measures in place, to avoid electrical shock.
Troubleshooting Flowchart
A systematic approach is key to efficiently troubleshooting a non-functioning battery switch. The following flowchart Artikels a logical sequence of checks.
Flowchart:
Start –> Is the battery switch in the correct position? –Yes–> Check appliance fuses and breakers. –No (problem with switch or connections)–> Check battery voltage at terminals. –Low Voltage (Battery Problem)—> Charge or replace battery. –Normal Voltage–> Check voltage at switch output.
–Low Voltage (Connection/Switch Problem)–> Inspect and clean battery terminals and switch connections. Tighten all connections. –Normal Voltage–> Check voltage at appliance terminals. –Low Voltage (Wiring Problem)–> Trace wiring for breaks or damage. –Normal Voltage (Appliance Problem)–> Check appliance fuses and breakers.
–End
Safety Precautions and Best Practices
Working with your travel trailer’s battery system requires caution. Improper handling can lead to serious injury from electrical shock, burns, or explosions. Always prioritize safety when dealing with batteries and electrical components. Understanding and following best practices will ensure both your safety and the longevity of your system.
Proper maintenance is key to preventing issues and ensuring your battery switch functions reliably for years. Neglecting maintenance can result in corrosion, loose connections, and ultimately, system failure. Regular checks and preventative measures are essential.
Safety Precautions When Working with Battery Switches
Before you even touch a battery or electrical component, take the necessary safety precautions. This will minimize the risk of accidents and ensure a smooth process.
- Always wear safety glasses to protect your eyes from sparks or corrosive battery acid.
- Use insulated tools to prevent electrical shock. Never use metal tools.
- Wear gloves to protect your hands from cuts, abrasions, and battery acid.
- Ensure adequate ventilation to avoid inhaling potentially harmful gases emitted by batteries.
- Have a fire extinguisher readily available, specifically one rated for Class B (flammable liquids) and Class C (electrical) fires.
- Never work on the electrical system in wet or damp conditions. Water and electricity are a dangerous combination.
- Disconnect the negative (-) battery terminal first when working on any part of the electrical system. This helps prevent accidental short circuits.
- Turn off all power to the system before starting any maintenance or repair work.
Best Practices for Maintaining the Battery Switch and Connections
Following these best practices will help extend the lifespan of your battery switch and ensure its reliable operation.
- Regularly inspect the battery switch and its connections for corrosion, loose wires, or damage. Clean any corrosion with a wire brush and baking soda solution.
- Tighten all connections to ensure a secure electrical contact. Use a torque wrench if available to avoid over-tightening.
- Apply dielectric grease to all connections to prevent corrosion and improve conductivity.
- Periodically test the battery switch to ensure it’s functioning correctly. Check that it properly isolates the batteries when switched off.
- Inspect the battery cables for any signs of wear or damage and replace them if necessary. Cracked or frayed cables are a fire hazard.
- Consider using a battery disconnect switch in addition to your battery switch. This allows you to completely isolate the batteries when the trailer is stored for extended periods.
Comparison of Different Battery Switch Types, Battery switch on travel trailer function
Various types of battery switches exist, each with its own advantages and disadvantages. Choosing the right one depends on your specific needs and budget.
Planning a trip? Don’t forget travel insurance! Seriously, it’s a lifesaver. Check out Aon travel insurance for comprehensive coverage; they’re pretty solid. Then, for a quick comparison, also look at Aon travel insurance options on this other site – sometimes they have different deals. Get quotes from both and choose the plan that best fits your needs and budget before you go! It’s way easier to sort this out beforehand than deal with unexpected issues on the road.
| Type | Advantages | Disadvantages | Typical Applications |
|---|---|---|---|
| Standard Rotary Switch | Simple, inexpensive, readily available | Can be prone to corrosion, limited switching capacity | Basic RV setups, smaller trailers |
| Perko Switch | Durable, robust construction, good for higher amperage | More expensive than rotary switches | Larger RVs, trailers with high power demands |
| Electronic Battery Switch | Precise control, remote operation possible, often with monitoring features | More expensive, more complex to install and troubleshoot | High-end RVs, trailers with sophisticated power management systems |
| Combination Switch (with charger) | Combines switching and charging functions, simplifies system | More expensive than separate switches and chargers | RVs needing integrated charging and switching capabilities |
Disconnecting the Battery Switch Before Maintenance
Proper disconnection prevents accidental shocks and damage to the electrical system. This process should be followed before any maintenance or repair work.
- Turn off all appliances and devices connected to the battery system.
- Locate the negative (-) battery terminal and disconnect it using an insulated wrench.
- Then, disconnect the positive (+) battery terminal.
- Once disconnected, visually inspect the switch and connections for any obvious issues.
- After completing maintenance, reconnect the positive (+) terminal first, followed by the negative (-) terminal.
Battery Switch and Different Trailer Setups
The type of battery switch you need for your travel trailer depends heavily on the size and complexity of your electrical system. Small campers often have simpler setups, while larger fifth wheels require more robust solutions to manage multiple batteries and potentially higher power demands. Understanding these differences is crucial for selecting and installing the correct switch and ensuring reliable power.Different trailer setups influence battery switch selection significantly.
The size and number of batteries directly impact the amperage rating required for the switch. Similarly, the inclusion of solar panels or generators necessitates a switch capable of handling the additional power sources.
Battery Switch Configurations in Different Trailer Types
Small, lightweight travel trailers often utilize a single 12-volt battery and a simple, single-pole, double-throw (SPDT) switch. This switch allows the user to select between battery power and shore power. Larger trailers, however, frequently incorporate multiple batteries (often two 6-volt deep-cycle batteries wired in series for a 12-volt system) and a more complex switch, like a multi-bank switch, to manage both battery banks independently and potentially provide a combined output.
Fifth wheels, with their extensive electrical systems and higher power demands, often employ sophisticated battery management systems incorporating multiple switches or even electronic control panels to monitor and manage power from multiple sources, including batteries, solar panels, and shore power. These might involve a combination of switches and digital displays that provide a clear overview of the battery status and the flow of power.
Battery Size and Number’s Impact on Switch Selection
The size and number of batteries directly influence the switch’s amperage rating. A small camper with a single group 24 battery might only need a switch rated for 100 amps, while a large fifth wheel with two group 31 batteries might require a switch rated for 200 amps or more to handle the higher current demands. Underestimating the amperage rating can lead to overheating and potential fire hazards.
It’s always recommended to select a switch with a higher amperage rating than strictly necessary to provide a safety margin. For example, if the calculated maximum current is 150 amps, a 200-amp switch would be a more appropriate choice.
Integrating Alternative Power Sources
Integrating solar panels or generators requires careful consideration of the battery switch system. A properly designed system allows for charging batteries from both shore power and alternative sources independently or simultaneously. This often involves a combination of a battery switch to select the power source feeding the house loads and a charge controller for managing the solar input.
The charge controller regulates the voltage and current from the solar panels to prevent overcharging the batteries. Some advanced battery management systems can even prioritize power sources, for instance, utilizing solar power first before drawing from the house batteries. A typical setup might involve a multi-bank switch for managing battery banks, a charge controller for solar panels, and a transfer switch for selecting between shore power and generator power.
Impact of Battery Switch Setups on Overall Electrical System Design
The battery switch configuration significantly affects the overall electrical system design. A simple SPDT switch in a small camper results in a straightforward system. Conversely, a large fifth wheel with a complex multi-bank switch and various power sources requires a more intricate wiring scheme with multiple fuses and circuit breakers to protect individual circuits and components. This necessitates more careful planning and potentially more specialized installation expertise.
For instance, a system with a dedicated battery bank for essential appliances, like the refrigerator and furnace, would require a more sophisticated switch setup compared to a simpler system where all appliances are powered from a single battery bank. The added complexity can affect wiring length, cable gauge requirements, and overall installation costs.
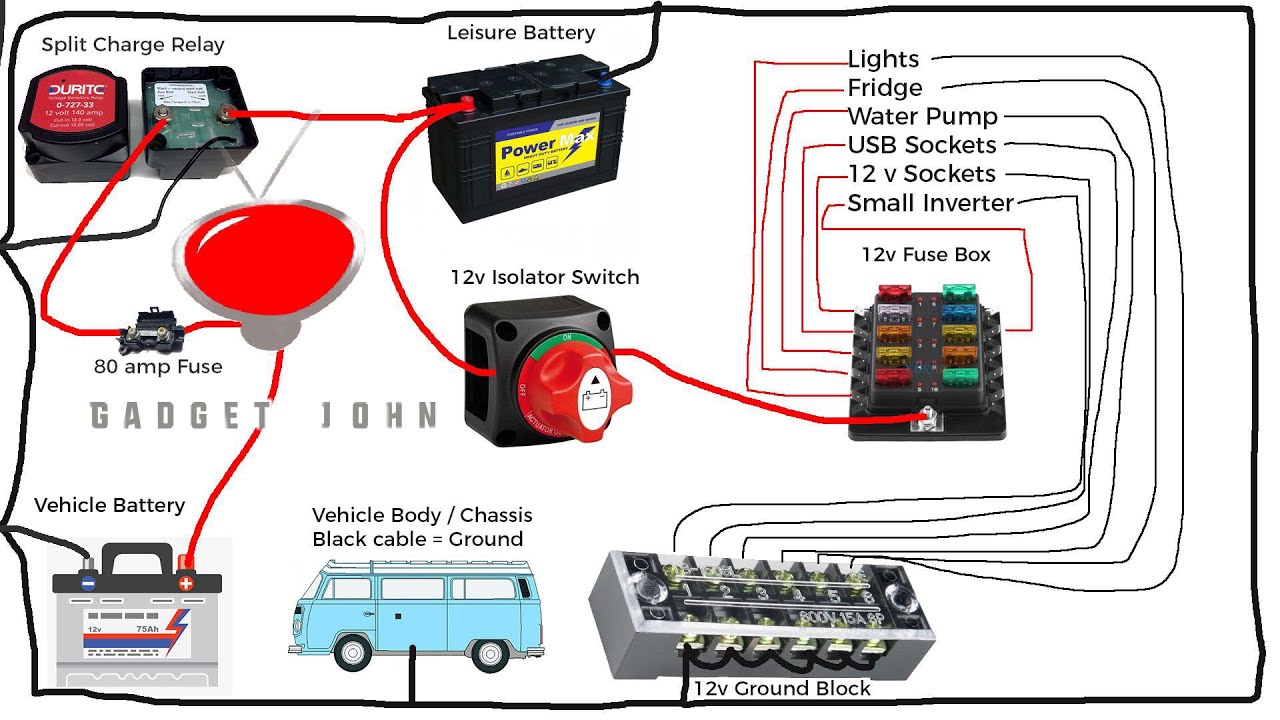
Visual Representations of Battery Switch Systems

Understanding how your travel trailer’s battery system works is crucial for reliable power. Visual aids can greatly simplify this understanding, allowing you to grasp the flow of electricity and the function of each component. Let’s look at some diagrams to illustrate this.
A clear understanding of your battery switch system is essential for safe and efficient power management in your RV. This section provides visual representations to help you understand the system’s operation.
Typical Travel Trailer Battery Switch System Diagram
Imagine a diagram showing a typical setup. We’ll start with two 12-volt deep-cycle batteries connected in parallel. This parallel connection means both batteries contribute to the overall power supply, increasing capacity. From the batteries, thick positive and negative cables lead to a battery switch. This switch is typically a three-position switch: “Off,” “Battery,” and “Shore Power.” From the battery switch, another set of cables runs to the trailer’s 12-volt distribution panel.
This panel houses fuses and circuit breakers protecting various 12-volt appliances within the trailer. A separate cable runs from the shore power inlet to the distribution panel. This cable carries 120-volt AC power from a campground hookup. A converter/charger is connected to the distribution panel and transforms the 120-volt AC to 12-volt DC for charging the batteries.
Finally, the distribution panel connects to all the 12-volt devices in the trailer.
This diagram illustrates the fundamental components and their interconnections. The crucial element is the battery switch which controls the power flow between the batteries and the trailer’s electrical system, and from the shore power to the system.
Electricity Flow Under Different Operating Conditions
Let’s explore how electricity flows through the system in different scenarios. The battery switch acts as the central control point.
Shore Power Connected: With shore power plugged in, the switch in the “Shore Power” position directs the 120-volt AC power from the shore power inlet to the converter/charger. The converter/charger converts this to 12-volt DC, which is then distributed to the trailer’s 12-volt system and also used to charge the batteries. The batteries themselves are not directly powering the trailer; instead, they are being charged.
Batteries Only: When the switch is in the “Battery” position, the 12-volt DC power flows directly from the batteries to the distribution panel, powering the trailer’s 12-volt appliances. The batteries are the sole power source in this mode.
Switch Off: In the “Off” position, the power flow is completely interrupted, preventing any discharge of the batteries or operation of the trailer’s 12-volt system.
Typical Location of the Battery Switch
The battery switch is usually located in a readily accessible location near the batteries themselves, often in a dedicated battery compartment. This placement is chosen for several reasons. First, it ensures easy access for switching between power sources. Second, it minimizes the length of heavy-gauge battery cables, reducing voltage drop and improving efficiency. Finally, this location is usually relatively protected from the elements, helping to prolong the life of the switch.
Mastering your travel trailer’s battery switch empowers you to manage power efficiently, extend battery life, and troubleshoot problems confidently. By understanding the different types of switches, their wiring, and proper operation, you can ensure a reliable power supply for all your RV’s appliances. Remember safety first! Always disconnect the battery before performing any maintenance. Happy travels!
FAQ Corner
What happens if my battery switch is left in the “off” position?
Leaving the switch off completely disconnects your house batteries from the trailer’s electrical system, preventing both charging and discharging. This is useful for storage but means no power to appliances.
Can I use a different type of battery switch than what came with my trailer?
Generally, yes, but ensure the new switch has the correct amperage rating for your system and wiring. Improperly sized switches can overheat and create fire hazards.
How often should I check my battery switch connections for corrosion?
Inspect your battery switch connections at least once a year, or more frequently if you notice any signs of reduced power or unusual smells.
My battery switch is making a clicking noise. What could be wrong?
A clicking noise often indicates a problem with the switch itself, possibly a failing internal component. It might need replacement. Check your battery voltage too; a low battery can cause this.
